JS libraries generation with Webpack
Configuration of a stack to generate libraries that can be imported by third-party services

We live in a time when Javascript dominates the web and the architecture based on microservices is taken as a standard. React, Vue and Angular have a dominant and growing position in the scene, however there is a large percentage of front development that is done the “old way” and it is necessary to encapsulate functionalities in a library so that they can be imported into an HTML.
A typical example is the import of a third-party widget, library or service into an existing website. The simplest and most basic option is to create a .js file and develop there, exposing the content using UMD if necessary. This would be a somewhat limited approach for libraries with complex functionality. Currently there are tools that allow the generation of libraries while developing in a modern stack js. This is the case of Webpack, a tool used by almost everyone, and especially in React but very unknown since it works “behind the curtain”.
In this article we are going to create a development boilerplate that generates a simple widget using Webpack. Before continuing, let’s add a bit of context about what Webpack is and what requirements we need to cover.
What is Webpack?
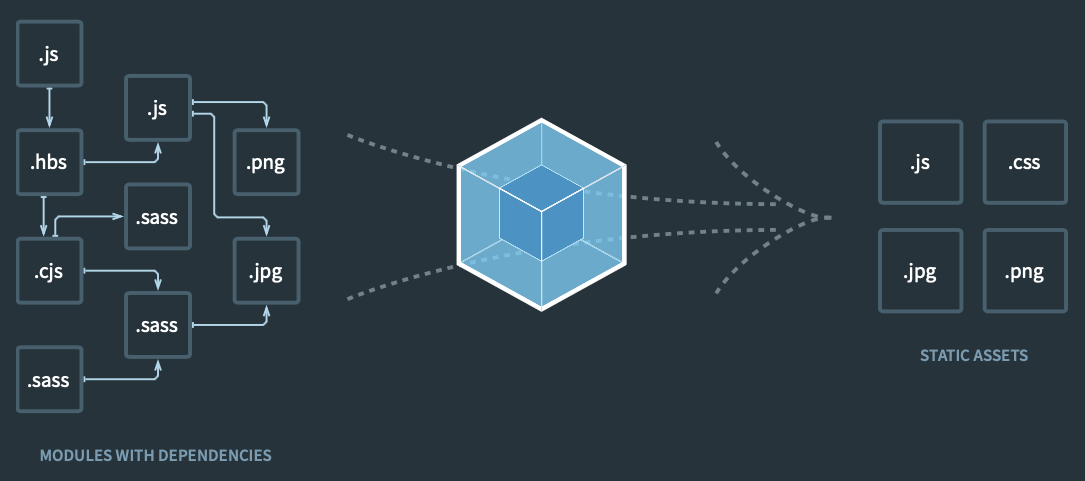
Webpack is a library that allows us to manage resources to do multiple tasks: from packaging code to putting it into production, compiling files [SASS](https: // sass- lang.com) or LESS, the generation of a development server with hot reloading, or the creation of a bundle, minification among others. For this, it uses rules in which once the file or code pattern has been recognized, make the pertinent modifications. This is done through loaders. There are loaders to compile SASS code, to minify html, to run Babel, etc …
One of the problems of Webpack that can do so many things that it is a bit overwhelming, and it is true: it can do many things, but for this case we are going to simplify and we are going to generate a script that:
- Generate a JS library that can be imported into HTML files and invoked from it
- Compile SCSS files
- Use ES6
- Contain ESlint and Prettier
- Be isolated from the hypothetical development in which it is imported
With these conditions set we are ready to start developing the boilerplate.
Creation of the application
Once the project is created with npm init we install Webpack and its dependencies:
npm install webpack@4 webpack-cli@3 webpack-dev-server html-webpack-plugin mini-css-extract-plugin html-loader sass-loader babel-loader css-loader node-sass --save-devVersion 4 of Webpack has been installed, due to an incompatibility with the SASS loader and as it is not the subject of this article, not much time has been invested in investigating it.
After this we install the Babel, Prettier plugins and their respective plugins:
npm install babel babel-eslint eslint-config-airbnb eslint-config-prettier eslint-plugin-import eslint-plugin-jsx-a11y @babel/preset-env @babel/plugin-transform-runtime @babel/plugin-proposal-object-rest-spread @babel/plugin-syntax-dynamic-import prettier --save-devESLint and Babel configuration
Since we have imported the AirBnb configurations to develop with its style rules, it is necessary to import them into ESLint through the file .eslintrc.js
module.exports = {
  parser: "babel-eslint",
  extends: ["airbnb", "prettier"],
  plugins: ["react", "jsx-a11y", "import"],
  env: {
    browser: true,
  },
};
We do the same with the Babel configuration file babel.config.js:
module.exports = {
  presets: ["@babel/preset-env"],
  plugins: [
    "@babel/plugin-transform-runtime",
    "@babel/plugin-proposal-object-rest-spread",
    "@babel/plugin-syntax-dynamic-import",
  ],
};
Webpack configuration
All Webpack action occurs in the file webpack.config.js. In this file, both the origin and destination of the data and the transformations that must be applied are set. Let’s go through the file step by step:
const webpack = require("webpack");
const HtmlWebpackPlugin = require("html-webpack-plugin");
const MiniCssExtractPlugin = require("mini-css-extract-plugin");

const SRC_DIR = `${__dirname}/src`;
const DIST_DIR = `${__dirname}/dist`;

const libraryName = "test-widget";

module.exports = {
  entry: [`${SRC_DIR}/index.js`],
  output: {
    path: DIST_DIR,
    publicPath: "",
    filename: `${libraryName}.js`
  },
In the initial part of the file we define the data source and the destination. We intend that the library is generated from the index.js file that is in the /src folder and is housed in the /dist. folder. In turn, we define the name of the resulting file, which in this case will be /dist/test-widget.js.
module: {
    rules: [
      {
        test: /\.(js|jsx)$/,
        exclude: /node_modules/,
        use: {
          loader: "babel-loader"
        }
      },
      {
        test: /\.(scss|sass|css)$/,
        exclude: /node_modules/,
        loaders: [
          MiniCssExtractPlugin.loader,
          {
            loader: "css-loader",
            options: {
              modules: true,
              sourceMap: true,
              importLoaders: 1,
              localIdentName: "[local]"
            }
          },
          "sass-loader"
        ]
      },
      {
        test: /\.(html)$/,
        exclude: /node_modules/,
        use: {
          loader: "html-loader",
          options: { minimize: false }
        }
      }
    ]
  },
Once the routes are defined, the generation rules are managed. in our case there are 3:
- Use the Babel loader for .js or .jsx files
- For sass, scss and css files use the CSS loader to generate the SourceMap and in turn pass the SASS loader
- For html files use the html loader and avoid minifying the content.
All loaders are documented on the Webpack page with information about their operation and their configuration options.
resolve: {
    extensions: ["*", ".js", ".jsx"]
  },
  plugins: [
    new webpack.HotModuleReplacementPlugin(),
    new HtmlWebpackPlugin({
      template: `${SRC_DIR}/index.html`,
      filename: "./index.html"
    }),
    new MiniCssExtractPlugin({
      filename: "[name].css",
      chunkFilename: "[id].css"
    })
  ],
  devServer: {
    contentBase: DIST_DIR,
    hot: true,
    port: 3000
  }
Finally, both the plugins for the hot reloading and the information related to the development server are added.
With all this information we are ready to add the tasks in the package.json file and start development.
"scripts": {
    "build": "webpack -p --mode production",
    "start": "webpack-dev-server --config ./webpack.config.js --mode development",
    "test": "jest --env=jsdom"
  },
Widget development
To test the operation we are going to create a simple file index.js that represents the entry point of the application and that takes as its source a div on which the content will be generated dynamically. To do this, we create an init function, which will be called when embedding the widget:
import Widget from "./components/widget";
import styles from "./styles/main.scss";
(function (window) {
  console.log("Widget initialized!");
  const _init = (params) => {
    Widget.generate(params, model);
  };
  window.Widget = {
    init: _init,
  };
})(window);
This file calls the component widget.js, which is responsible for taking the one parameter that serves from container and add the relevant content there:
const Widget = {};

/**
 *
 *
 * @param {*} { container = "" }
 * @param {*} [model={}]
 */
Widget.generate = ({ container = "" }) => {
  const widgetInner = document.createElement("div");
  let widgetContainer = document.getElementById(container);

  widgetInner.setAttribute("class", "module-inner");
  widgetInner.innerHTML = "<h1>Widget created</h1>";

  if (!widgetContainer) {
    [widgetContainer] = document.getElementsByTagName("body");
  }

  widgetContainer.appendChild(widgetInner);
};

export default Widget;
With this, and once the npm run build command is called, we can create an html file by calling the library:
<!DOCTYPE html>
<html>
  <head>
    <meta charset="utf-8" />
    <title>Test Widget</title>
    <script src="test-widget.js" type="text/javascript"></script>
  </head>
  <body>
    <div id="widget-container"></div>
    <script type="text/javascript">
      Widget.init({
        container: "widget-container",
      });
    </script>
  </body>
</html>
That’s all. You can see the final result of this little boilerplate in this Github repository.