GitHub packages
Create and publish Angular packages in your repository

The use of packaging is common in Open Source projects through NPM, but there is also the possibility of publishing your own private packages so that they can be consumed by your applications without exposing them to all the world. We are used to working in closed and monorepo projects (or at least learning languages and frameworks under this operating mode), but it is increasingly common to divide the functionalities of a project by scope into packages, especially in relation to systems development design and components.
In this article we will delve into publishing packages from Angular using GitHub Packages.
Introduction
Let’s imagine that we are developing a design system or a component library in Angular and we want to use it in several projects. The initial idea is to create a project in Angular, develop the components, do a build and publish it in NPM. This has multiple drawbacks and several limitations:
- You are exposing the complete code of the project
- You are publishing an application made up of components, not the components themselves, with the derived performance problems.
- NPM is a public package repository, so everyone would have access to that package.
To avoid these problems we can make use of two tools from Angular and GitHub: Angular Libraries and Github Packages.
Angular Libraries
An Angular Library or Angular library is an Angular project that differs from an application in that it cannot run on its own. A library must be imported and used in an application.
GitHub Packages
GitHub packages is a GitHub feature that allows you to publish and consume packages using the GitHub infrastructure, with multiple integrations including NPM, which we require for our test project.
Project creation
To create the project it will be necessary to have the Angular CLI, so if it is not installed it will be installed using the following command.
npm install -g @angular/cliWe proceed to create the project. It is ** important to add ** the -create-application = false flag so that it does not generate the standard Angular file structure, although it may not be added to test “on the fly” the behavior of the components that will be part of the design system. .
// Project creation
ng new rubenr-system-design --create-application=false
cd rubenr-system-design

// Library creation
ng generate library system-design-library
This last command will generate a file structure similar to that of a standard Angular application with the difference that the content will hang in the projects folder and that the library itself has its own configuration files and its package.json
Project configuration
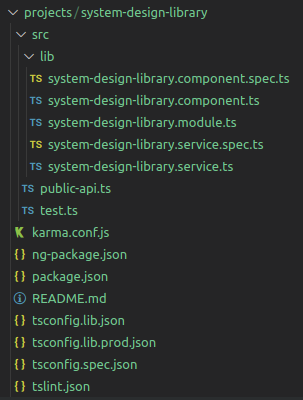
Since we want our library to have multiple components, we are going to rename the component, module and service created and we are going to create another one, resulting in the following file structure:
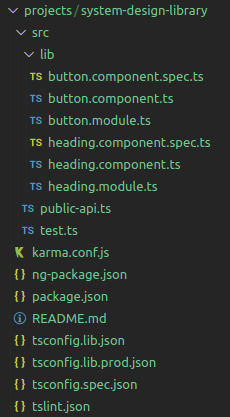
The content of the Button and Heading components is as follows:
import { Component, ElementRef, EventEmitter, Input, OnInit, Output } from '@angular/core';

@Component({
  selector: 'rr-button',
  template: `
    <button [ngClass]="classMap" (click)="onClick.emit($event)">{{text}}</button>
  `,
  styles: [
  ]
})
export class ButtonComponent implements OnInit {

  @Input() color: "primary" | "success" | "danger" = "primary";
  @Input() disabled: boolean = false;
  @Input() outline: boolean = false;
  @Input() text = "";
  @Output() onClick = new EventEmitter<any>();

  rootClass: string;
  classMap: any;

  constructor(private elementRef: ElementRef) {}
  ngOnInit() {
      this.rootClass = this.elementRef.nativeElement.tagName.toLowerCase();
      this.updateClassMap();
  }
  updateClassMap() {
      this.classMap = {
          [`${this.rootClass}`]: true,
          [`${this.rootClass}--${this.color}`]: !!this.color,
          [`${this.rootClass}--outline`]: this.outline,
          [`${this.rootClass}--disabled`]: this.disabled,
      };
  }
  ngOnChanges() {
      this.updateClassMap();
  }
}
import { Component, Input, OnInit } from "@angular/core";
@Component({
selector: "rr-heading",
template: ` <h1>{{ text }}</h1> `,
styles: [],
})
export class HeadingComponent implements OnInit {
@Input() text = "";
}** It is important to modify the component calls ** ButtonComponent and HeadingComponent in the button.module and heading.module modules.
Once the component calls have been modified, the components and modules must be exposed so that when doing the build, the components can be consumed. This export is usually done in the document ** public-api.ts **
/*
 * Public API Surface of system-design-library
 */

export * from "./lib/button.component";
export * from "./lib/button.module";
export * from "./lib/heading.component";
export * from "./lib/heading.module";
Publishing
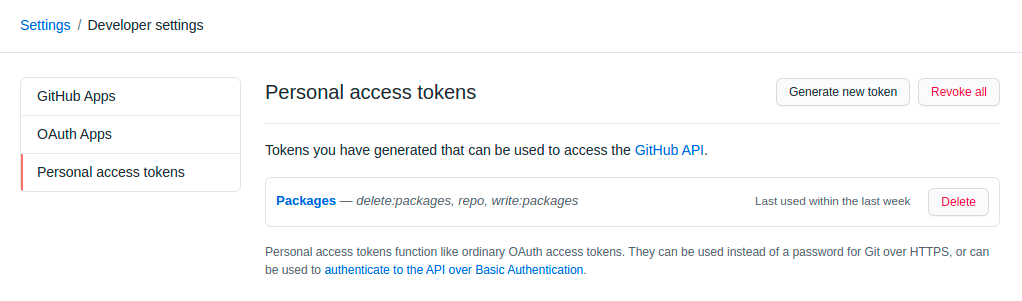
Before publishing we need to ** create a personal token ** in our GitHub account. This can be done in Settings / Developer settings / personal access tokens. The new token created must have permissions to write and delete packages as can be seen in the following image:
Once the token is created, we copy it and add it to the ** _. Npmrc _ ** file of our Angular project, which if it does not exist, we must create it.
@rubenrp:registry=https://npm.pkg.github.com/
//npm.pkg.github.com/:_authToken=<TOKEN_ID>
After this it is necessary to make modifications. On the one hand, modify the package name so that it corresponds to ** @ vendor / package-name **. At the same time, the repository where the package will be published and the origin of the GitHub registry must be added as seen in the following example:
{
  "name": "@rubenrp/rubenr-system-design",
  "version": "0.0.0",
  "repository": {
    "type": "git",
    "url": "https://github.com/rubenRP/angular-package-test.git"
  },
  "publishConfig": {
    "registry": "https://npm.pkg.github.com"
  }
}
** Important **: the private: true property must not exist in the package.json file. This property prevents the publication of both public and private packages.
With this we can generate the build and publish it from the terminal.
ng build
// Version for production use
ng build --prod
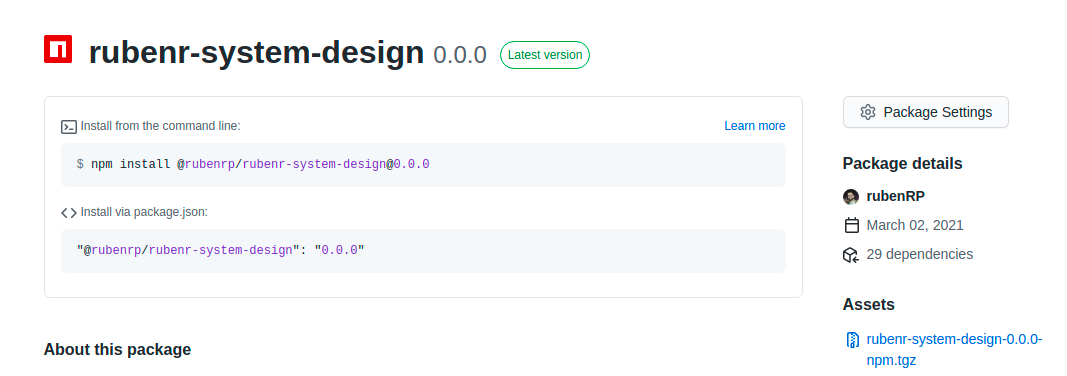
npm publishIf everything has gone well we can go to the repository where we have published the package and we will see that a new release has been generated.
Consumption of the package
In order to consume our components of the newly created design system, it is necessary to add or create a .npmrc file in our angular project with the information regarding the reference repository of the package.
@rubenrp:registry=https://npm.pkg.github.com/To finish we proceed to install our package
npm install @rubenrp/rubenr-system-designReady! We can now make use of the components created in our design system by calling its selector.
<rr-button></rr-button>
<rr-heading><rr-heading>
References
https://designhandbook.mendesaltaren.com/design-systems
https://angular.io/guide/libraries
https://github.com/features/packages
https://docs.github.com/en/packages/guides/configuring-npm-for-use-with-github-packages